Contacts
Odoo allows users to either delete or archive a contact. If there is a chance that a contact record could be valuable in the future, it's better to consider archiving rather than deleting it.
How to do either:
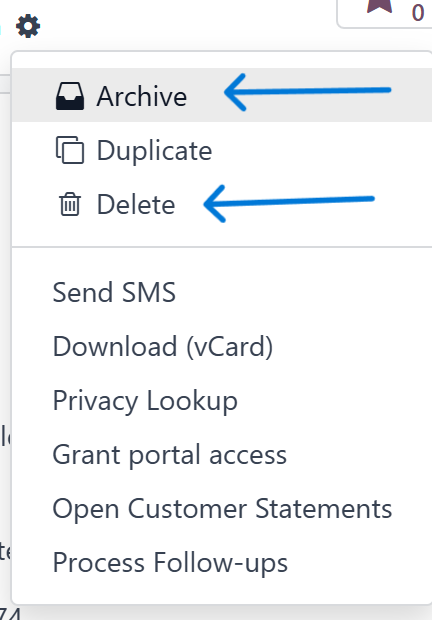
After selecting a contact record or navigating from the company record, you will notice the breadcrumbs located at the top left of the screen. These breadcrumbs represent the path you have taken to reach this point. At the end of this breadcrumb trail, there is a small gear icon, known as the action menu, which is accessible throughout Odoo.

Clicking on this gear icon will reveal various options for actions such as archiving, deleting, and more.
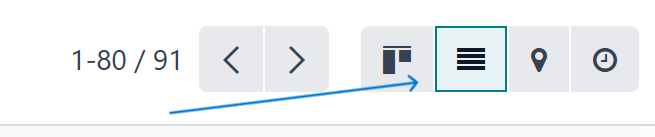
If you prefer a different layout, you can change to list view by clicking the buttons at the top right of your screen, which will arrange the contacts in a vertical list.
In this view, you can select records using the checkboxes on the left side.
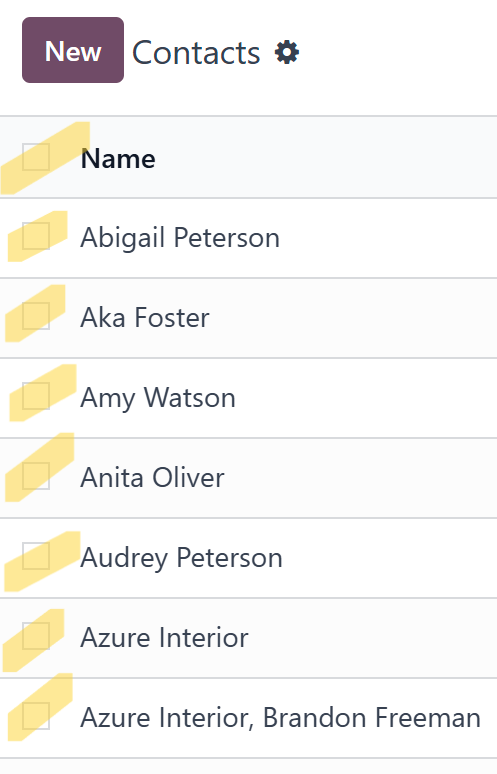
After tagging one or more records, you’ll notice a gear icon or action menu at the top center of the screen, where the search field is usually located. By clicking on this icon, you can choose various actions like archiving or deleting the selected items.
Note: In order to delete a contact, it is necessary that there are no related transactions or dependencies, such as contracts or payment records. If the contact is tied to any other records, you must first remove those before you can proceed with deleting the contact.
Odds-n-Ends
Odoo Debug - Minimal and fast extension to toggle debug mode of Odoo.
Odoo Debug - Chrome Web Store
Odoo Debug - Microsoft Edge Addons
Odoo Toolbox - Enhances the experience of Odoo developers and Odoo.SH users by adding a variety of tools and features.
Odoo Toolbox - Chrome Web Store
The All-in-One Odoo Extension for Developers & Consultants (It's Free) - YouTube - English subtitles
Odoo Utility - Simple shortcuts and tools to save time
- Activate the developer mode.
- Go to Settings > Languages > Manage Languages.
- Select the language in question, by clicking on it.
- You will find Date Format, Time Format and Short Time Format fields that can be modified as desired.
There are various times when you need to know the TECHNICAL database name of an Odoo database.
An easy way to get such is to use the Odoo Toolbox browser extension (documented above under Browser Extensions here in this same Odds-n-Ends section on this web page). The "technical sidebar" feature, along with the "technical fields" button will get you where you can see the technical database name (and a whole lot more information).
Another way to get the technical database name is to paste this code in a server action on whatever model you like, run it, and it will show you the name of the current database so you can copy and paste it.
for record in records:
raise UserError(env.cr.dbname)
Do you need to know how to configure your own email domain in Odoo?
Odoo's documentation: Property Fields
Also, review this forum discussion for a somewhat dated but more TECHNICAL discussion: Can anyone clearly explain property fields?
In Odoo 18, a user is automatically assigned as a follower on a record in the following scenarios:
1. When the User Creates the Record
- If a user creates a task, lead, opportunity, sale order, invoice, or any other document, Odoo automatically adds them as a follower.
- This ensures they receive notifications about updates to the record.
2. When the User is Assigned to the Record
- If a user is assigned a task, opportunity, or any document (e.g., via the "Assigned to" field in CRM or Project apps), Odoo makes them a follower.
- This helps keep them informed about changes.
3. When the User Interacts with the Record
- If a user comments (logs a note) on a record in the Chatter, they may be added as a follower.
- This depends on the document type and Odoo's default behavior for that model.
4. When the Record is Linked to the User via a Rule
Some Odoo applications automatically add followers based on system rules. For example:
- Project tasks: The project manager or assignee might be added as a follower.
- Sales Orders & Invoices: The salesperson or accounting team can be added automatically.
5. When a User is Mentioned (@username) in the Chatter
- If someone mentions a user in a comment (e.g., @John Doe), Odoo adds them as a follower to ensure they see future updates.
6. When the Record is Shared via Email
- If an email is sent from the record (e.g., sending a quote from the Sales app), the recipient is automatically added as a follower.
- Recognize this is one scenario when the follower COULD be someone EXTERNAL to your organization (e.g. a lead, customer, etc.)
Community Question
I'm troubleshooting an issue in Odoo's Accounting module and need to track the exact SQL queries executed when creating, modifying, or posting invoices, journal entries, and payments.
- How can I enable logging to capture these queries?
- Are there specific settings or modules in Odoo that allow SQL debugging for accounting-related transactions?
- Can PostgreSQL logs or Odoo's built-in logging be configured to filter only queries related to the account.move and account.move.line tables?
I'm using Odoo 16.0 on Odoo.sh.
Any advice on the best approach to capture and analyze these SQL queries would be appreciated!''
Community Answer
See this forum posting for the detailed answer: How to Log SQL Queries Related to Odoo Accounting Transactions? | Odoo
(This same procedure should be doable for more than just Odoo Accounting.)
Video description
As businesses increasingly adopt custom email domains, it's crucial to understand the technical setup and best practices to ensure smooth email communications. Join us for a comprehensive session where we will demystify SPF, DKIM, and redirections within Odoo. Learn how to configure your domain for optimal deliverability and security, ensuring that your emails reach their intended recipients without landing in the spam folder. Don't miss this essential guide to leveraging your own domain in Odoo with confidence and compliance!
In Odoo, there are three types of actions that can be configured as needed:
Server Actions:
Can be triggered at any point. Only run when we click a button.Runs on the current record if in form view.Runs on every record selected if in list view.Scheduled Actions:
Launch every hour, day, week, month, etc. (based on passage of time).Perfect for jobs you don't want to forget.Example: Sending out customer statements at the end of each month.Tip: Make sure the Next Execution Date is accurate.- Automated Actions: Triggered by something changing on a record.
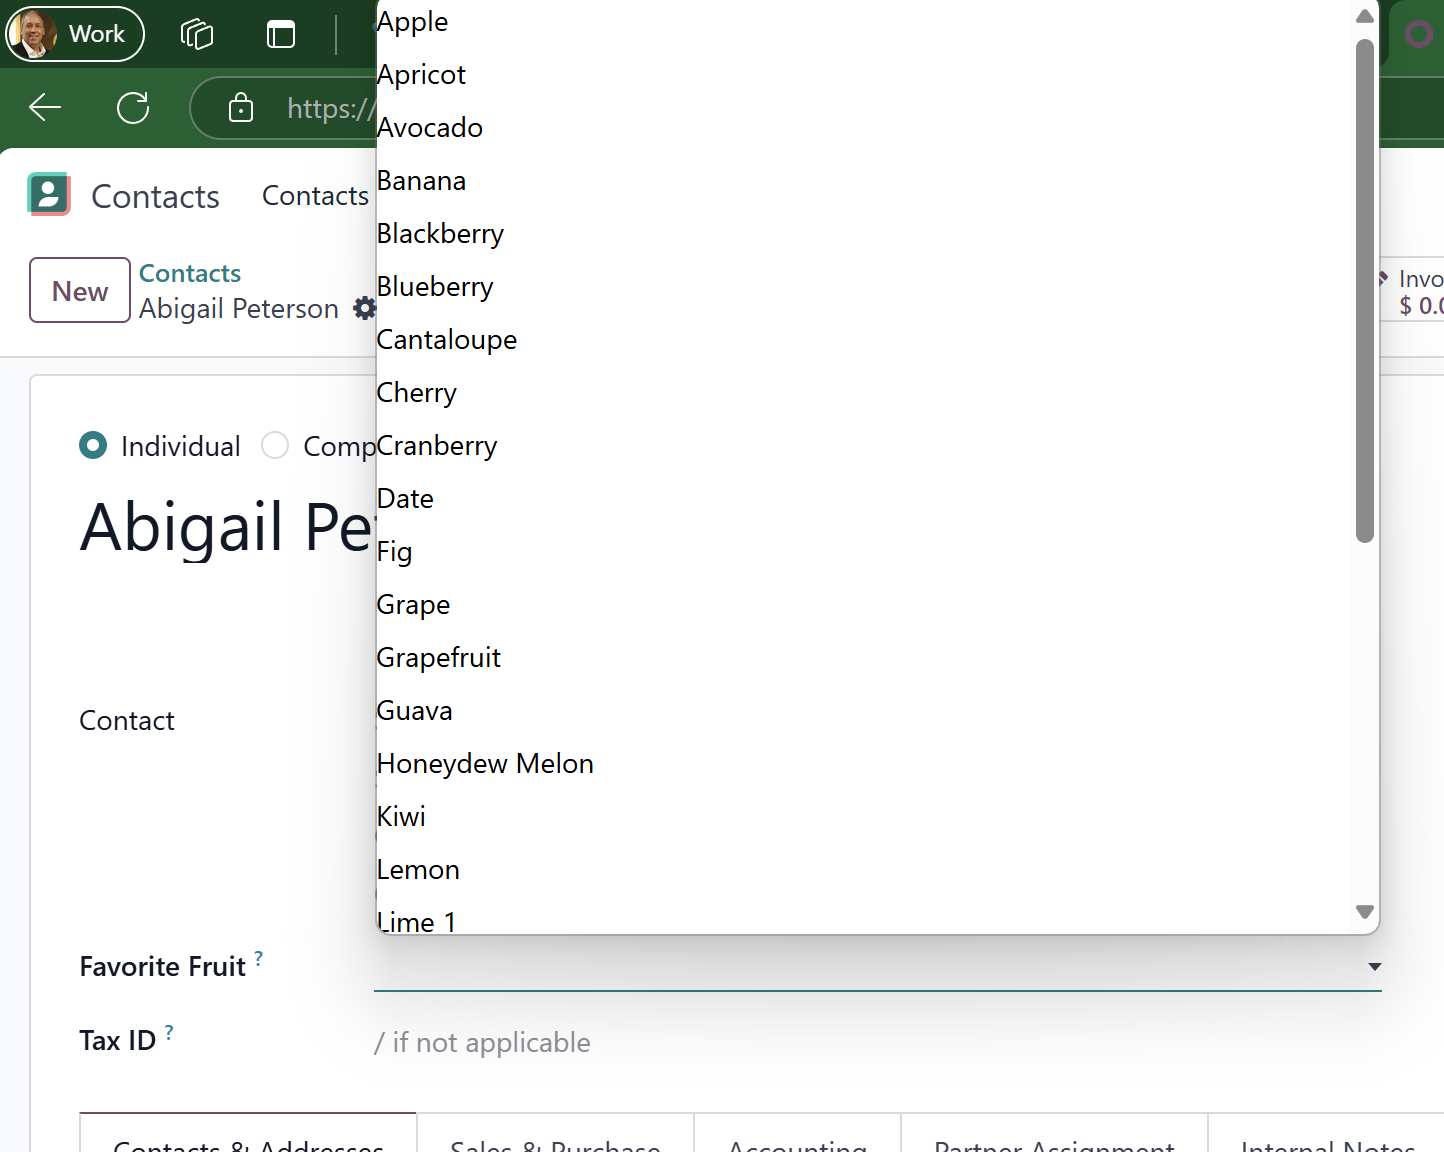
If you ever need to populate a custom selection field with lots of values, and don't want to manually type each one or even copy-n-paste each one...
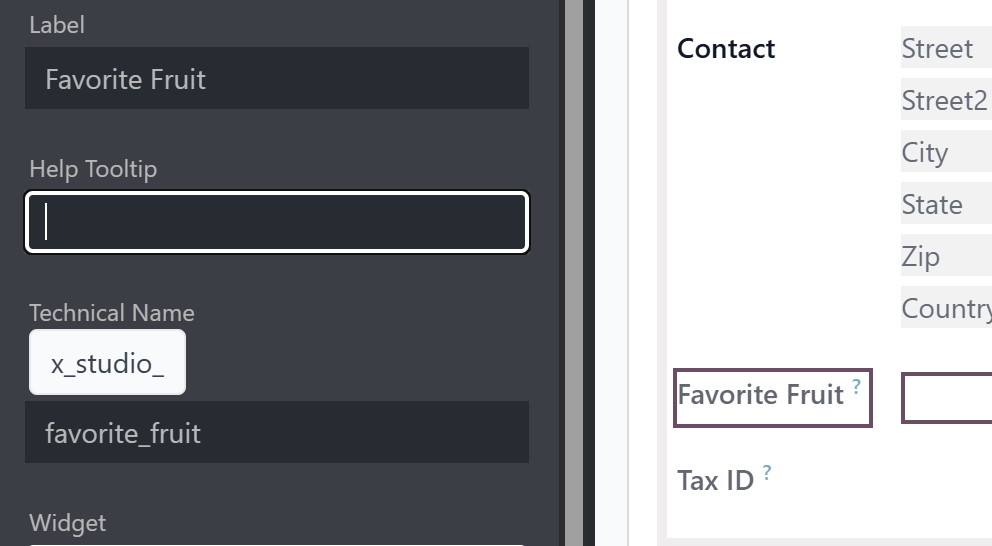
In this example, we are populating a custom selection field named Favorite Fruit with various selections to pick from. We already have the various fruit values in a text file, so we can manipulate them as needed.
1) Using Studio, create the selection field, giving it the first (but only the first) of the many possible selections.
2) Finish defining this field as desired (e.g. name, location, attributes, etc.).
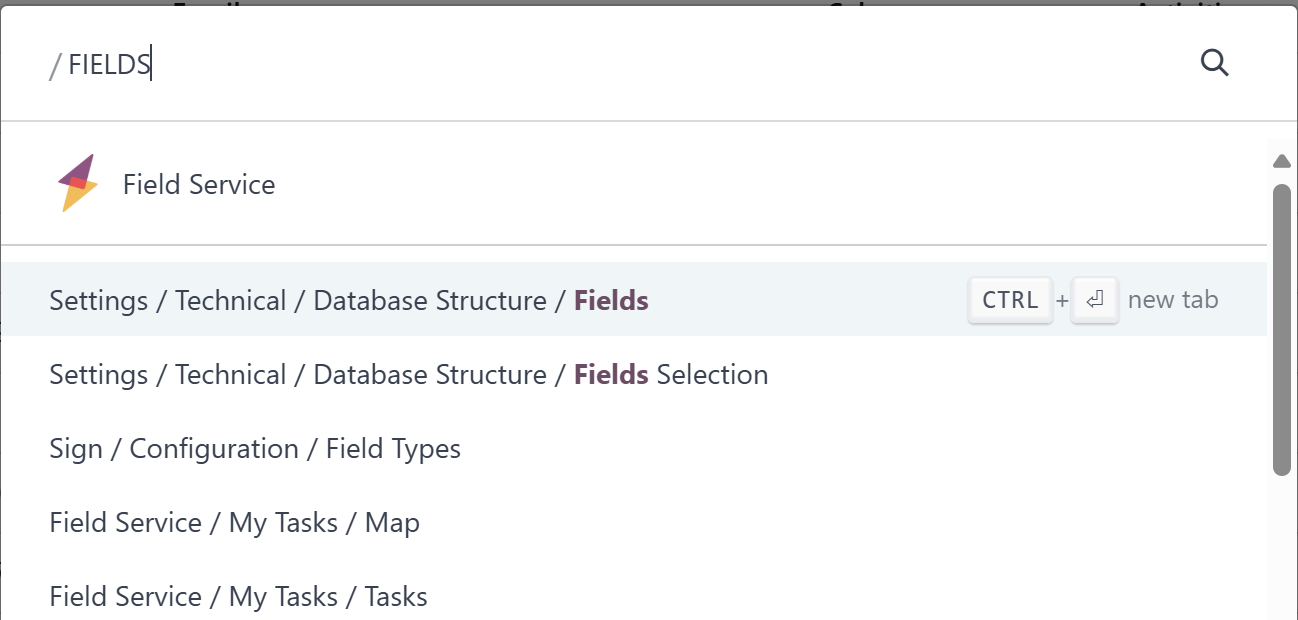
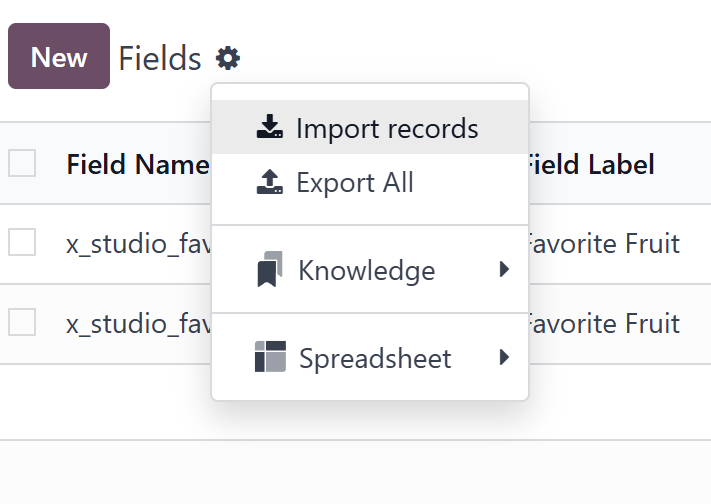
3) Activate Developer mode, and navigate to Database Structure | Fields, using whatever method you prefer.
4) Search for the selection field in question.

5) Select the field, making sure to pick the version that is Stored.

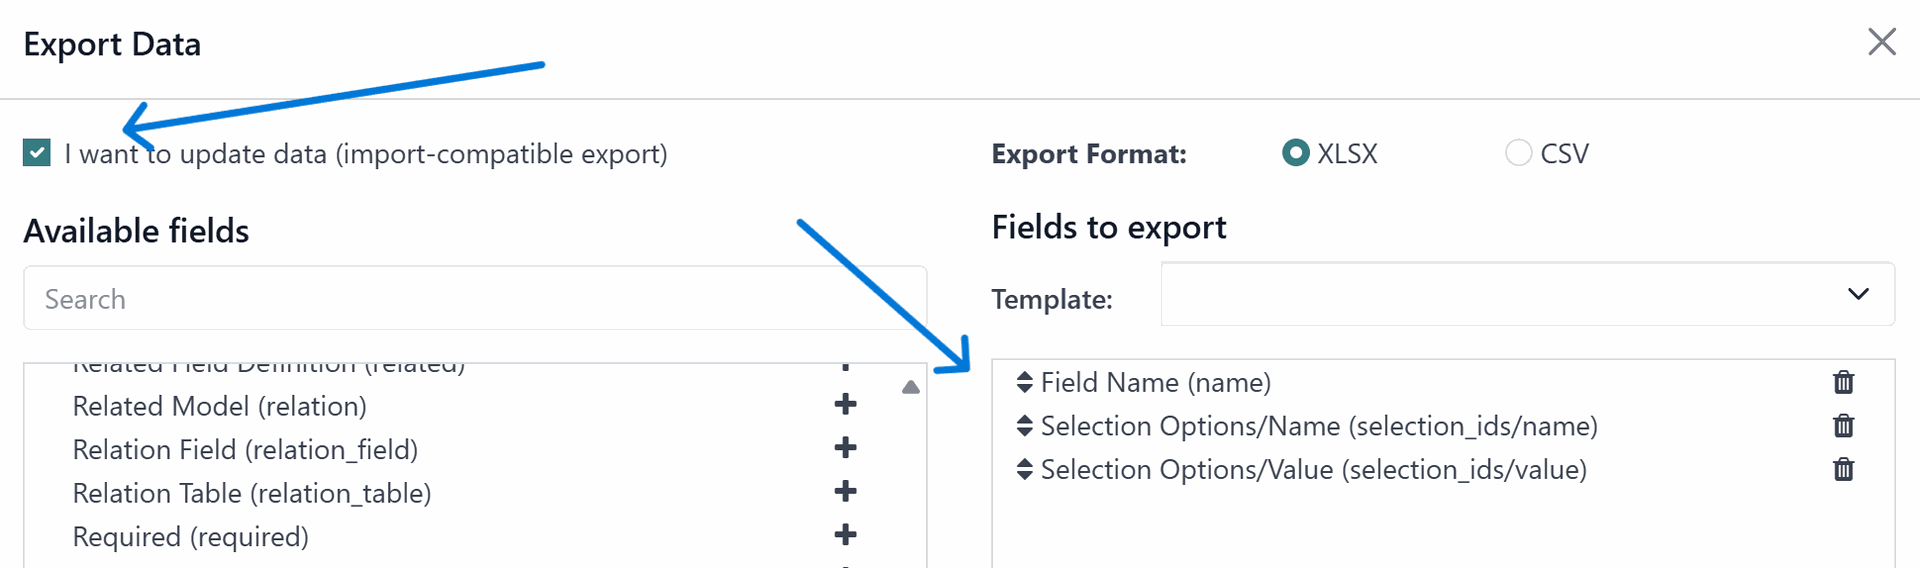
6) With the field selected, via the Actions menu (gear icon), choose to Export this field.
When defining the export, be sure and CHECK the "I want to update data (import-compatible export)" option.
When selecting the fields to export, simply choose these three fields:
- Field Name (name)
- Selection Options/Name (select_ids/name)
- Selection Options/Value (select_ids/value)
Export to an XLSX file.
7) Edit the exported file.
You'll notice there are four fields, as the first one is the unique identifier that is going to be used to UPDATE this field when we re-import this record.
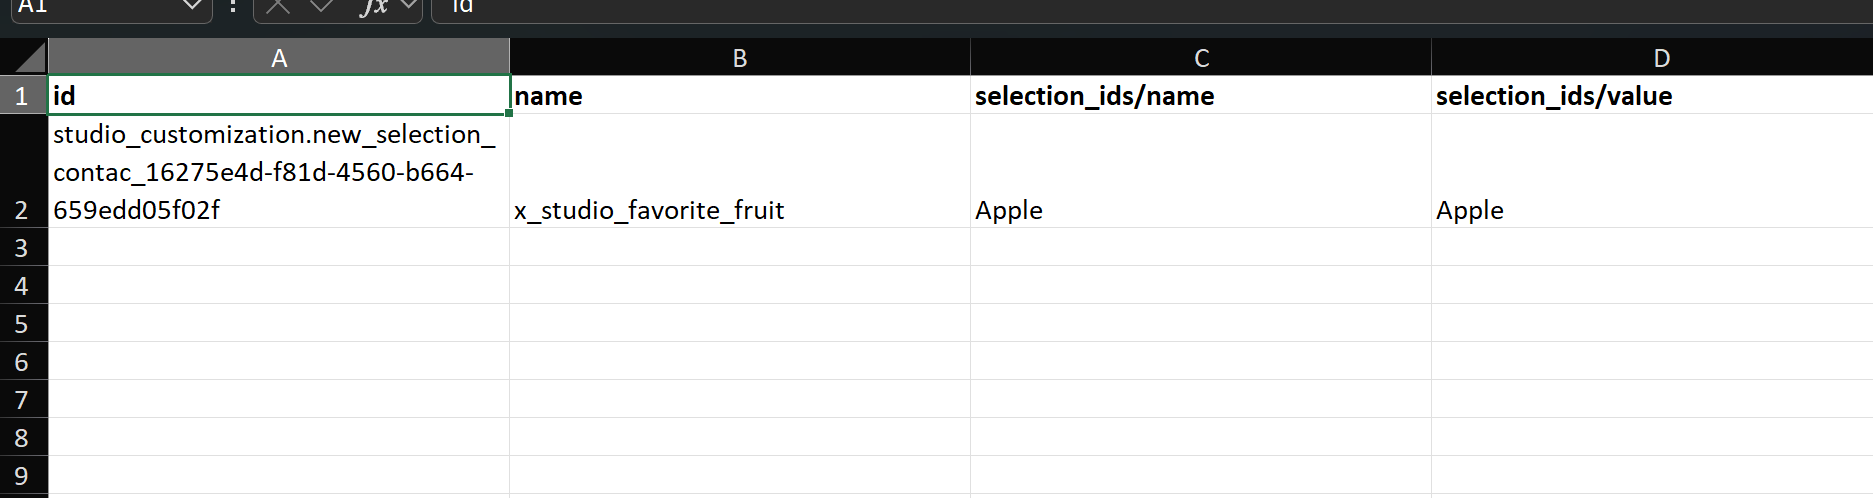
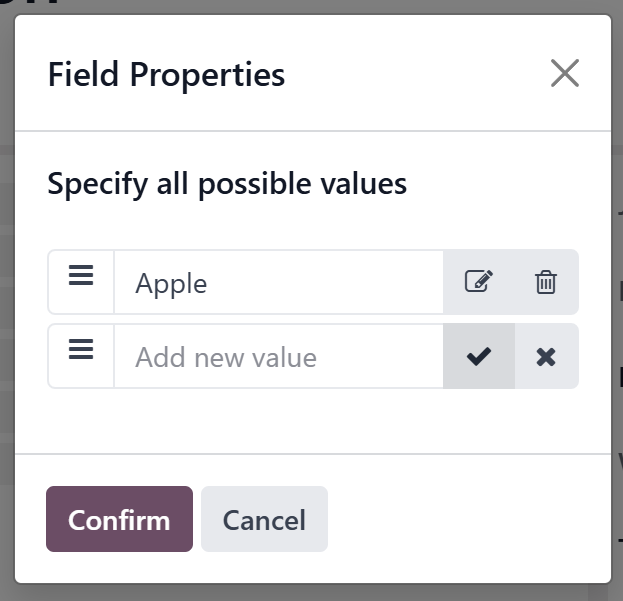
8) Now, in the two columns showing the single selection value entered when defining this custom selection field (Apple in our example), enter all the other values (one per cell), making sure to overwrite the first value as we cannot re-import that already existing value.
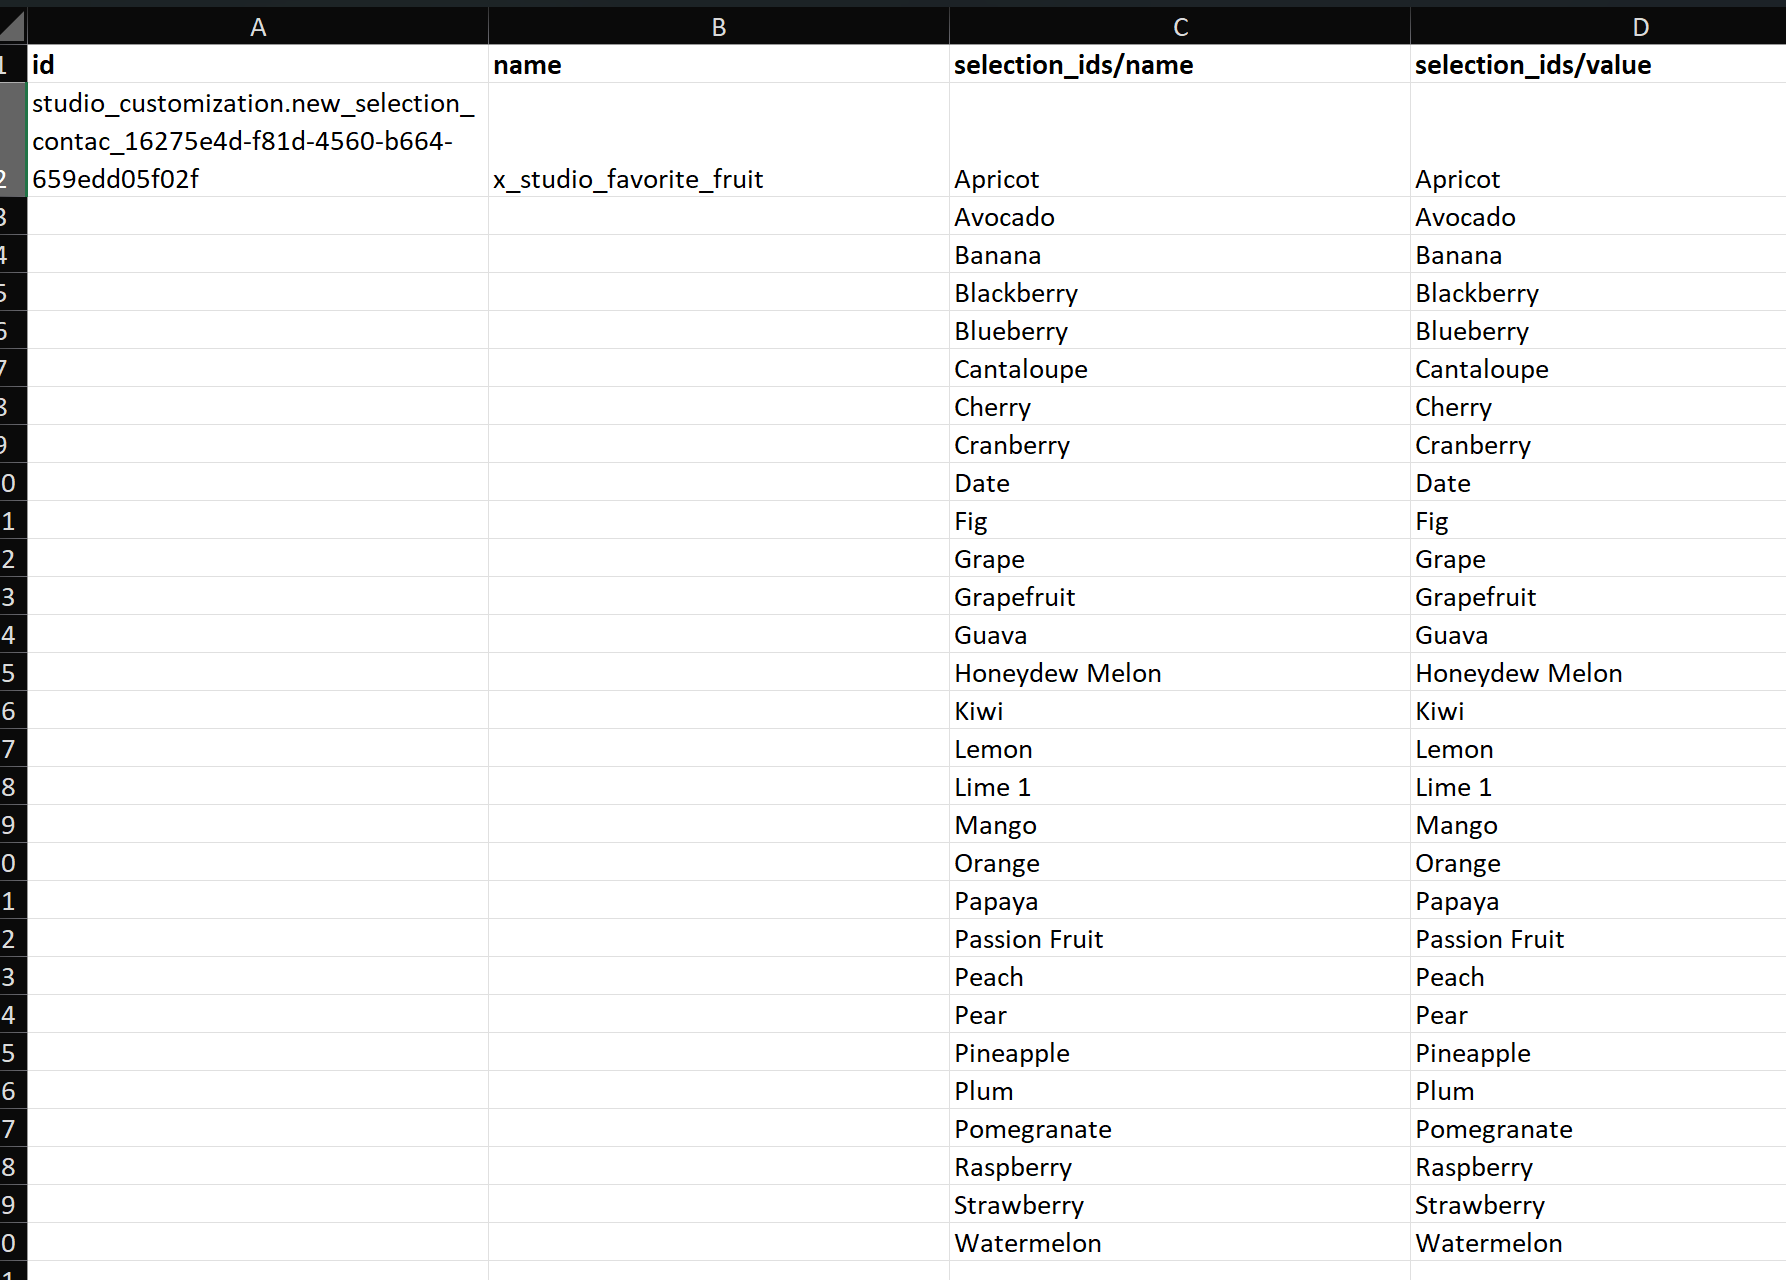
Notice that Apple has been overwritten with Apricot in our example above. Save the updated spreadsheet.
9) Before re-importing this data, notice the selection field currently only has a single value to choose from.

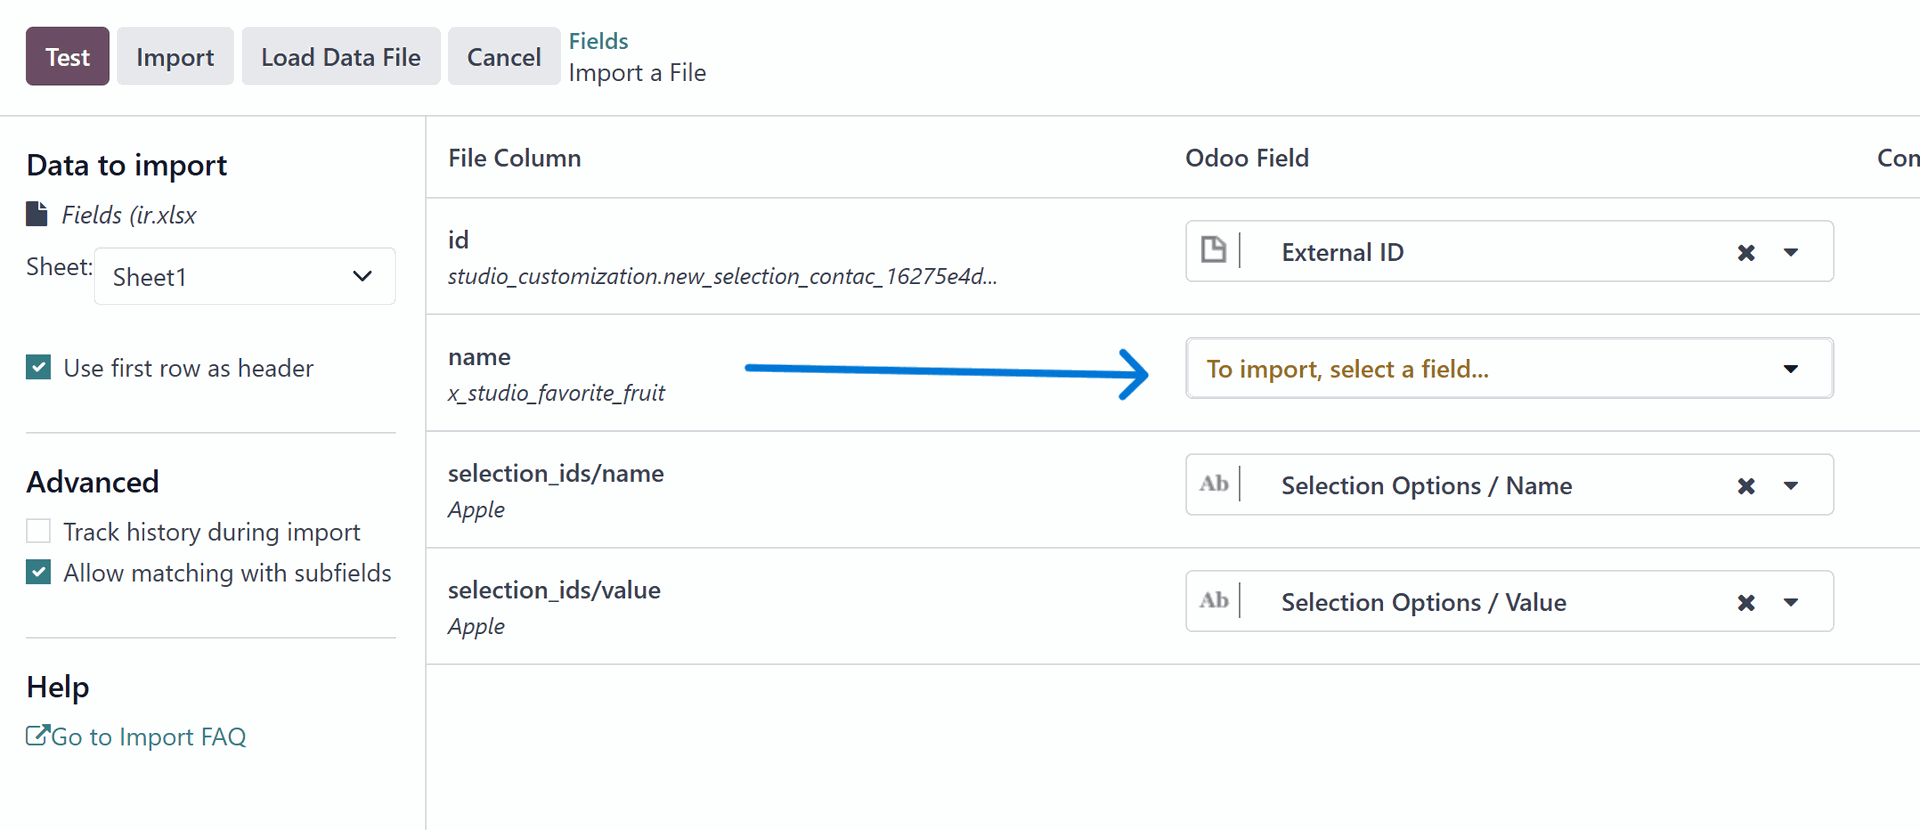
10) Now, back at the Database Structure | Fields screen showing our custom selection field, via the Action menu, choose to Import records.
11) On the fields mapping screen, all four fields will map automatically. However, we don't need to re-import the name field. So, click the X to remove its mapping.
12) Clicking the Test button should yield an "Everything seems valid." message.
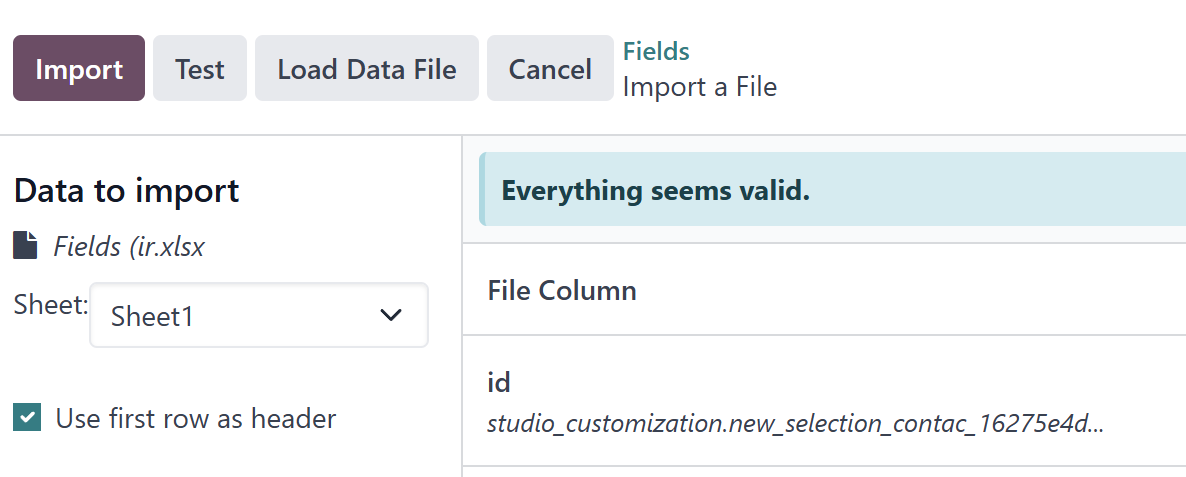
If you receive any other message, you will need to resolve the issue before proceeding.
13) Once "Everything seems valid", click the Import button.
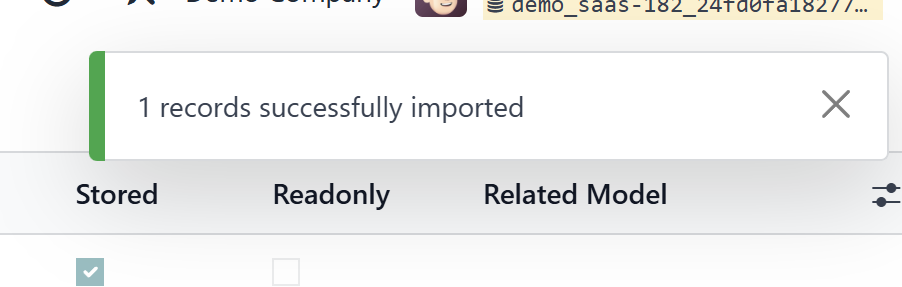
At the top right, a message should indicate "1 records successfully imported".
14) Make sure to refresh your browser page and go confirm that all the desired selection values are now showing up for the new field.
Congratulations! 🥇 Mission accomplished! 🚀
If your emails are landing in spam, it could be a trust problem.
What’s the difference? Each of these field types serves a different purpose in Odoo, and choosing the right one makes your app more user-friendly:
- Selection fields – Use for a small, fixed set of choices. A Selection field lets users pick one value from a predefined list (for example, Status = Draft/Confirmed/Done). This is ideal when the list of options is relatively static and won’t change often. Selection fields are quick to set up and don’t require a separate model. However, if you find yourself wanting to add options frequently or store extra info for each option, that’s a sign to consider a different field type.
- Many2One fields – Use for a dynamic list of records (single selection). A Many2One creates a link to another model (like a dropdown of records). This is great when the choices might grow over time or need additional data. If users need to manage the list of options themselves (add/edit entries) or the options have properties (like a code or hierarchy), go with Many2One. In Studio, you can create a new model on the fly for a Many2One field (e.g. a new Category model) if one doesn’t exist. Use Many2One when you want one choice per record, but the list is maintained as data.
- Tags (Many2Many) fields – Use for multiple values or labels on a record. An Odoo Tags field allows you to select multiple items (it’s essentially a Many2Many relation displayed as colored tags). Use this when a record can belong to several categories or have multiple labels at once. For example, Contacts can have multiple “Tags” in the form of categories, or a Task could have several tags. This is perfect for flexible tagging: users can often create new tags on the fly and assign many to a record. Choose a Tags (Many2Many) field if more than one option at a time should be selectable.
Quick recap: Selection = one choice from a fixed list. Many2One = one choice from a dynamic list of records. Many2Many (Tags) = multiple choices from a list of records.
When in doubt, consider how the data will be used:
- If you know the values won’t change (and you only need one value per record), a Selection keeps things simple.
- If the values are more like master data or you need to attach extra info to each option, go Many2One.
- If you need multi-select, go Many2Many (Tags).
Credit: ODIY Dispatch (Andrew Luck)
Outlook Calendar
CAUTION!
When setting up synchronization between Odoo's Calendar and Outlook's Calendar, the documentation warns you about any activities that include attendees and how Outlook will resend invitations, etc. It is stated this is a behavior of Outlook that cannot be controlled or changed by Odoo.
Well, a warning you will NOT get is that doing this setup will DELETE any recurring activities you have setup in Odoo. There is no warning, this simply happens. When you go back to setup a NEW recurring activity in Odoo, you will THEN receive this warning:
Due to an Outlook Calendar limitation, recurrence updates must be done directly in Outlook Calendar. If this recurrence is not shown in Outlook Calendar, you must delete it in Odoo Calendar and recreate it in Outlook Calendar.
So, the best approach for implementing synchronization between Odoo and Outlook calendars is to FIRST manually recreate all recurring Odoo activities in Outlook and delete them in Odoo. Then, once the synchronization is setup, they will be synced from Outlook to Odoo. Or, better still, if you have the foresight to do so, you should configure and implement this syncing BEFORE your users start defining their own calendar items in Odoo.
- Log into Outlook on the web.
- Goto to Settings (gear icon).
- Select Calendar, then Events and invitations.
- Uncheck Add online meeting to all meetings.
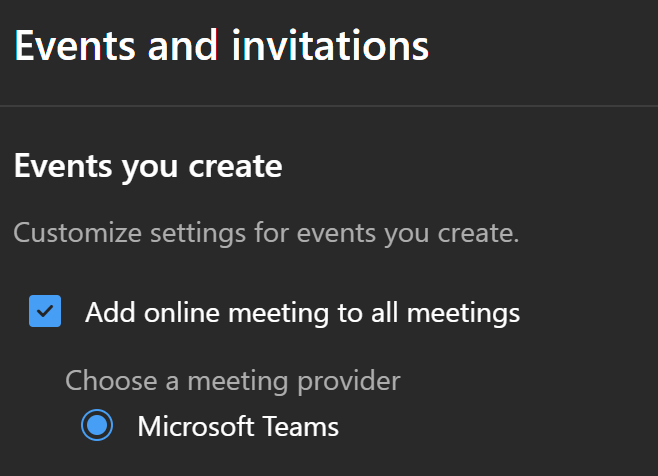
5. Make sure your changes are saved.
Website
Question
Using Odoo's Website app, is there a way to setup a series of messages and have them randomly displayed on a given page, such that each time the page is refreshed a different random message will show?
Answer
Yes, you can achieve this in Odoo’s Website app by using a combination of the Embed Code block and JavaScript to randomly display messages. Here’s how:
Steps to Implement
1) Go to the Website Editor:
- Navigate to your Odoo website and click on Edit to enter the website builder.
2) Add an Embed Code block:
- Drag and drop the Embed Code block onto the page where you want the messages to appear.
3) Insert JavaScript Code:
- Inside the Embed Code block, add the following script:
<div id="randomMessage"></div>

<script>
    document.addEventListener("DOMContentLoaded", function() {
        // Define your messages (without individual formatting)
        var messages = [
            "Welcome to our website!",
            "Check out our latest products!",
            "Limited-time offer: Get 10% off!",
            "Follow us on social media for updates!",
            "We value your feedback!"
        ];

        // Pick a random message
        var randomIndex = Math.floor(Math.random() * messages.length);
        var selectedMessage = messages[randomIndex];

        // Display the message
        var messageDiv = document.getElementById("randomMessage");
        messageDiv.innerText = selectedMessage;

        // Apply global formatting
        // messageDiv.style.fontSize = "20px";  // Text size
        messageDiv.style.fontWeight = "bold"; // Bold text
        messageDiv.style.color = "blue"; // Text color
        // messageDiv.style.textAlign = "center"; // Center text
        // messageDiv.style.padding = "10px"; // Add spacing
    });
</script>
4) Save and Publish:
- Click Save and then Publish your page.
How It Works
- Every time the page is loaded or refreshed, the script randomly selects one of the predefined messages and displays it in the #randomMessage div.
This is a simple, no-code solution that works without any Odoo custom development.
This works for displaying the PDF directly on the web page with controls and a download option.
One example from elsewhere on this page:
- Within the Odds-n-Ends section, notice "Email Domain Name Configuration".
- Beneath the one-line description of "Do you need to know how to configure your own email domain in Odoo?", is a PDF document for viewing and potential downloading.
This was created by editing the Website page and adding an "Embed Code" block. The default HTML code in the block was then replaced with:
<iframe src="https://forhimconsulting.odoo.com/web/content/2917?download=false" width="100%" height="600px" style="border:none;"></iframe>
For other uses, the URL noted above, https://forhimconsulting.odoo.com/web/content/2917, should be replaced by the URL pointing to the online PDF, making sure to add ?download=false at the end.
If the PDF is not already online, you can add the desired PDF to an Odoo-based website as a "media" item first. The URL can then be recorded and the media item removed from the webpage. Once you have the applicable URL to the PDF, you can then use the Embed Code block as noted above.
Non-Odoo specific items
You shouldn't be spending 15 hours to prepare a 5 minute presentation.
And let's face it, out here in the real world often you're told today that you're presenting tomorrow morning (or this afternoon).
Instead of freaking out, ask a few questions and use my SPARK framework to outline your talk.
You'll still need to develop out the content and practice the delivery, but you can create a well-ordered presentation on a tight deadline.
Your time is too valuable to be spinning your wheels for hours trying to organize what you're trying to say.
In this carousel I give you a few questions and the SPARK framework you can use the next time you're on a tight deadline.
If you include a link (URL) to a specific website page (e.g. https://www.odoo.com/help) and want to also search for and highlight specific text on that website page, simply include this text after the regular link text:
#:~:text=
Then, after the equal sign, include two text strings separated by a comma. The first text string is where to being your highlight and the send text string is where to end your highlight.
Here is an example that uses this text to begin the highlight: Emergency lines
...and this text to end the highlight: 40 500 100
NOTE: In HTML, spaces are replaced with %20
https://www.odoo.com/help#:~:text=Emergency%20lines,40%20500%20100